Driving with Lyft Maps
Lyft Maps is designed to help you navigate and earn with ease. It also adapts while you drive.
A simpler map will appear to help you stay focused on the road when the Lyft app detects that your vehicle is in motion.
During a ride, you can access important actions and information by swiping up on the bottom panel. You can also request emergency help on the menu.
The app will reveal more features once your vehicle is stopped.
Skip to:
Driving with Android Auto or CarPlay
Android Auto and CarPlay connect your phone to your vehicle’s infotainment system and display screen.
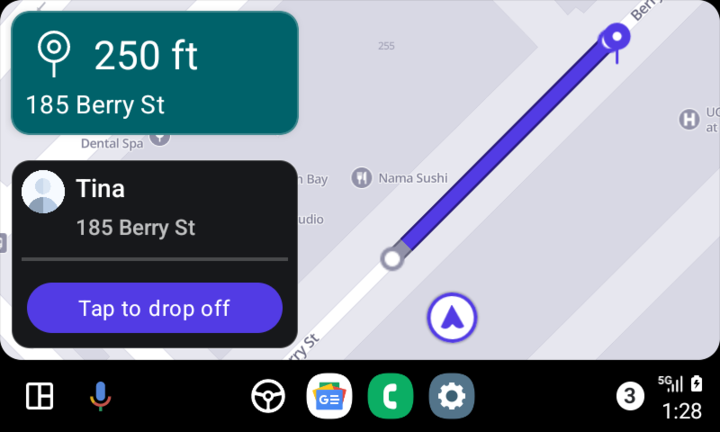
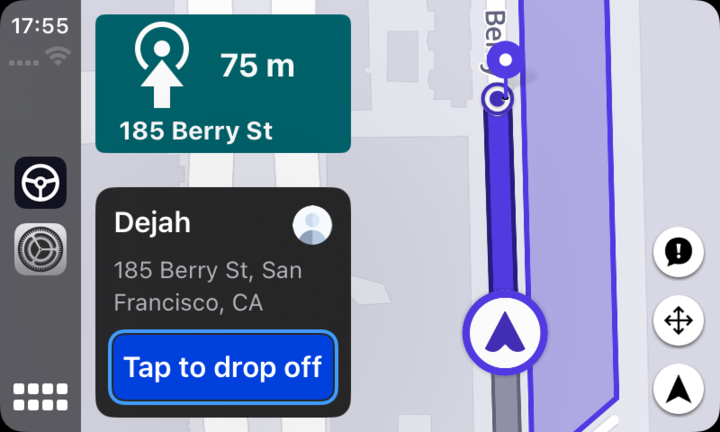
If your vehicle supports Android Auto or CarPlay, your car screen can display Lyft Maps navigation and other rideshare features such as tap to arrive, pick up, and drop off riders.
Follow the in-car setup instructions to connect your phone.
iOs connection issues
If you’re having trouble connecting your phone, you may need to disable the private Wi-Fi address option.
To disable the private Wi-Fi address:
- Go to ‘Settings’ on your iPhone, then go to the wireless network settings.
- Find the car's wireless network (likely includes your car brand).
- Disable the ‘Private Wi-Fi address’ option.
If that doesn’t work, you may need to reboot your iPhone and the car’s infotainment system. Then, connect your iPhone to the car with a cable the first time. The wireless connection should work after turning off the engine.
Setting up Android Auto
To set up Android Auto:
- Make sure that you’re using Android version 11 and above and that your vehicle supports Android Auto.
- Connect your phone to your vehicle through Bluetooth or with a USB cable.
- Make sure that your phone's Bluetooth, Wi-Fi, and Location Services are turned on.
- Android Auto should start once you’ve paired your phone with your car. You may need to follow on-screen prompts to start Android Auto if pairing takes more than a few seconds.
Select the Driver app icon from the Android Auto home screen if you don’t see Lyft Maps or the Driver app appear as it does below.
Here are instructional videos from popular manufacturers:
Learn more about setting up Android Auto here.

Setting up CarPlay
To set up CarPlay:
- Make sure that you’re using a supported iPhone device and check that your vehicle supports CarPlay.
- Connect your phone to your vehicle through Bluetooth or with a USB cable.
- Make sure that your phone's Bluetooth, Wi-Fi, and Location Services are turned on.
- CarPlay should start once you’ve paired your phone with your car. You may need to follow on-screen prompts to start CarPlay if pairing takes more than a few seconds.
Here are instructional videos from popular manufacturers:
Learn more about setting up CarPlay here.

Tesla touchscreen navigation
Tesla owners can view pickup and dropoff routes on their Tesla touchscreen.
How it works
Once you accept a ride, Lyft sends the rider's pickup address to your Tesla touchscreen. From there, navigation to your destination begins.
You won't see the drop-off address on the screen until you've swiped to pick up.
To opt in:
- You must have the Tesla app downloaded.
- Go to either Navigation settings or EV Hub Settings in your Lyft Driver app.
- Tap 'Tesla touchscreen navigation.' Enable sending routes to your Tesla user account.
- Read the details and tap 'Get started.'
- Log in to your Tesla account through the login and authentication webpage hosted within the Lyft Driver app to grant Lyft access.
- Check the boxes next to 'Vehicle Information' and 'Vehicle Commands.'
- You'll be redirected to your Tesla app to approve third party access for lyft.com. If you have trouble with this step, set up a third-party virtual key here.
- Open the Tesla app and tap "Allow" on pop-up.
- Return to the Lyft app to use the Tesla screen for navigation on your next ride.
To opt out:
- Go to either Navigation settings or EV Hub Settings.
- Disable sending routes to your Tesla user account.
If you want to permanently disable sending routes to your Tesla screen, log back in and revoke permission from your Tesla account.
You won't be able to use Tesla touchscreen navigation if:
- Your Model S or Model X is 2020 or older.
- Your touchscreen isn't in the map/navigation mode.
Battery usage tips
Android devices
If you want to help extend your Android device’s battery life while using Lyft Maps, we recommend turning on ‘Battery Saver’.
Battery Saver helps maximize your device’s battery life while using Lyft Maps.
You can turn this on by following these steps:
- Go to ‘Menu’
- Select ‘Account, then ‘Settings’
- Then select ‘Navigation and sound’
- Toggle ‘ON’ Battery Saver
iOS devices
If you want to help extend your Apple device’s battery life while using Lyft Maps, we recommend turning on Apple’s ‘Low Power Mode’ feature on your device.
You can turn this on by following these steps:
- Open your device ‘Settings’
- Select ‘Battery’ then ‘Power Mode’
- Toggle on ‘Low Power Mode’
Note: This action is done in your phone’s settings, not in the Lyft Driver app.
Lyft Maps feedback
Beta and experienced drivers can leave feedback on Lyft Maps or navigation issues.
How it works
You can click the flag icon to report a navigation issue. Once you’re not in an active ride, you can select the issue type and submit feedback.
To submit feedback:
- During a ride, tap the ‘Report later’ option.
- When you’re offline, tap the flag and select the feedback category you want to report.
- Fill in the necessary information, and add an optional comment if needed.
- Select ‘Submit’.
Note: Not all drivers will be able to report a navigation issue using the flag icon.
You can also report navigation issues after a ride. To submit feedback after a ride:
- Go to trip details.
- Select the ride with the navigation issue.
- Select ‘Report navigation or road issue’ and place the pin on the map where the issue occurred during the ride.
- Select the feedback category you want to report.
- Fill in the necessary information, and add an optional comment if needed.
- Select ‘Submit’.
You can update and submit tickets within 24 hours after creating them. You can see your list of tickets only when you’re offline.
Our team will review your ticket and make fixes as soon as possible.
See also: